
|
|
|
 What if there was ONE tool that could help you learn orthopedic evaluations as a student physical therapist (SPT)?What if this same tool reduced errors? And was easy to use, low-tech, and cost $0? Would you use it? What if I told you that tool was a checklist… When you are first learning how to perform orthopedic evaluations as an SPT, the demands on your attention can be overwhelming. Within your evaluation time frame- say you have 20-30 minutes, you must: take a subjective history, perform comprehensive testing (range of motion, strength, joint play, palpation, and special tests), as well as move the patient efficiently through multiple body positions (supine, prone, standing, sitting, etc.), and finally you must distill all of this information into a differential diagnosis. Whew! It is a lot to think about when you first start off! Any tips and tricks to improve efficiency, accuracy, and consistency of your physical therapy (PT) evaluation are truly valuable. 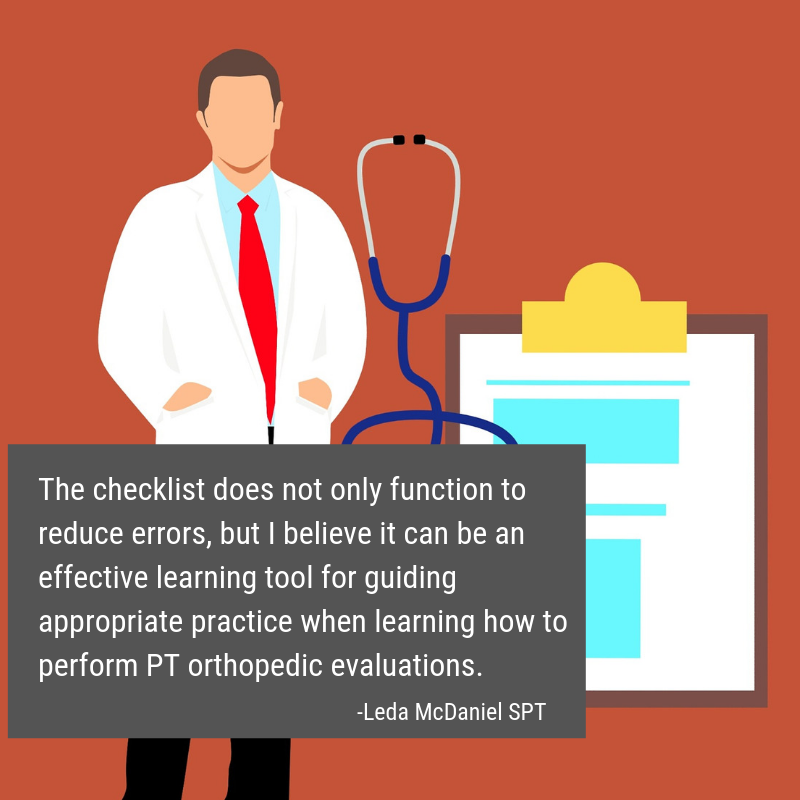 One tool that I have come to rely upon in learning how to perform a consistent and effective evaluation, in a timely manner is The Checklist. As I’ve written about before (Can A Checklist Make You A Better PT?), checklists have been used in various medical settings with positive outcomes (improving patient outcomes, reducing medical errors, and guiding treatment decisions). The checklist does not only function to reduce errors, but I believe it can be an effective learning tool for guiding appropriate practice when learning how to perform PT orthopedic evaluations. If you want to get good at the evaluation process, it is not enough to just practice evaluations. You must take a hard look at HOW you practice evaluations. There has been a lot written about this concept in scientific journals as well as the popular literature on expertise and skill learning. (1,2,5) In order to improve a skill to the level of “mastery” or “expertise”, you must practice that skill in very specific ways. The way you practice must include focused attention as well as a means for receiving reasonably timely feedback. As students, some of this feedback can come from our professors, some can come from peers, but much of our feedback is self-delivered feedback. Setting up conditions for practicing evaluations is not so different from how you might approach (or teach) someone who is learning a new movement skill. The complex skill, either movement skill or orthopedic evaluation, must be broken down into its component parts and each part practiced to the extent that it is performed correctly. Here are three key areas for optimizing your evaluation practice (and how checklists can help):1. Break Down The Evaluation into “Sets and Reps” 1st “Parts” Practice > 2nd “Whole” Skill Practice
“Practice” the way you want to “Play”
The Fundamentals Must Be Automatic Before You Get Fancy
 As clinicians, I think there is a natural desire to want to feel the state of “Flow” early on- that everything is clicking and you are utilizing a unique combination of scientific “truths” and intuitive judgments in your evaluations. But, flow and mastery take time to develop. So, I would argue that as you are starting out, the number one priority should be to make your evaluations as consistent as possible- almost to the extent of feeling “boring” or rote. This idea, I think is well expressed by famous psychologist, Mihaly Csikszentmihalyi, who coined the term “Flow” (4) and is author of the book: “Creativity: Flow and the Psychology of Discovery and Invention” (3). In this book, he writes,“You must first learn your craft and then set it aside.” I’m off to practice my evaluations… -Leda McDaniel, SPT Please Visit Her Website For Examples Of Her Orthopedic Evaluation Checklists Leda is a current Doctorate of Physical Therapy (DPT) candidate at Ohio University and upon graduating in May 2019 is interested in working with orthopedic patients with chronic pain. Leda recently published a book about her experience of personal recovery from chronic pain, which you can find on Amazon: https://www.amazon.com/dp/069212120Xref_=pe_870760_150889320 You can also find her blogging at: https://sapiensmoves.wordpress.com/ References:
4 Comments
One of the foundations in our residency and fellowship training and a component of our courses is Sahrmann's Movement Impairment Syndromes (MIS). While it has its faults, the system can be incredibly effective in identifying and categorizing abnormal movement patterns. When reading the text, it becomes apparent that the concept isn't all that unique; however, the system connects clinical reasoning pathways in a very easy to understand way. Recently, I had two patients come in with presentations of thigh and knee pain that I initially diagnosed with meniscus tear with sciatic nerve adverse neural tissue tension (ANTT). While this diagnosis may be correct in some circles, our current understanding on the lack of correlation between tissue injury and pain means there can be many different methods of diagnosis and treatment. Under Sahrmann's MIS, I would classify the patients' presentations as Hip Extension with Knee Extension Syndrome. While the diagnosis is targeted towards the hip, the presentation can include posterior thigh pain (similar to sciatic nerve ANTT). I thought it would be an interesting presentation to review. 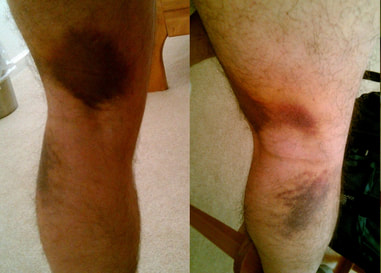 With Hip Extension with Knee Extension Syndrome, pain may present at either the ischial tuberosity or along the hamstring muscle belly. Pain may be present with moving from sitting to standing, walking, sitting, and negotiating stairs. The primary issue that develops with this condition is overuse of the hamstring muscle. Due to weakness in the quads and/or glutes, the hamstring muscle becomes the primary hip and knee extender. The hamstrings very obviously can extend the hip, but they can also extend the knee if the foot is fixed. Movement Impairments and Examination: When the patient gets up from a chair or goes up the stairs, it appears as if the knee moves backwards to pull the body up as opposed to the body leaning forward and using the glutes/quads to extend the hip and knee. You may also see the hip extend during a long arc quad and the glute won't displays any contour changes during prone hip extension until the end of the motion. Additionally, the knee is typically held in hyperextension (and possibly hip internal rotation) in standing, which typically is a swayback posture. In testing, the hamstring is tender, tight, and painful with contraction. Typically the glutes and lateral rotators are weak (the quads may or may not test weak with MMT). Hip flexion may be stiff due to hypertonicity in the hamstrings. Slump test may be negative, but may be positive with presence of >1 condition. 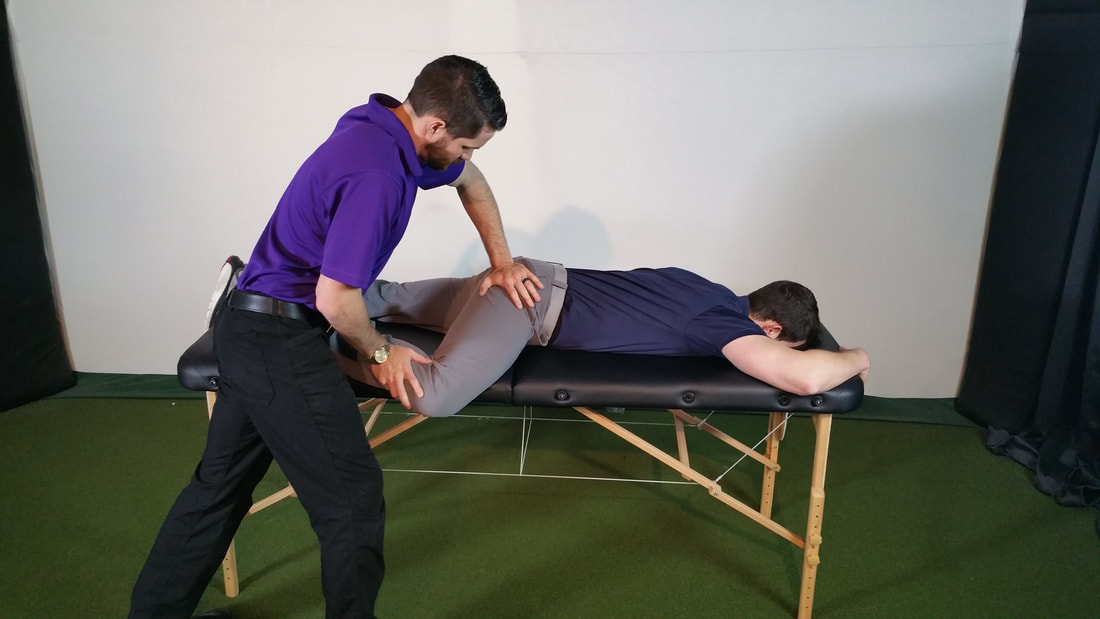 Treatment: Overall, the goal is to strengthen the glutes, hip lateral rotators, and quads, while simultaneously decreasing overactivity in the hamstrings. This includes avoiding hyperextension of the hip and knee and encouraging glute contraction during gait, stairs, and transfers. Exercises that are encouraged include (for more detail on each one, check out the Sahrmann textbook on MIS or check out the Management of the Hip Course): -Quad Rock Back -Heel Slide without Rotation -Straight Leg Raise -Prone Hip Extension with Glutes -Prone Bilat Hip LR Isometric -S/L Hip Abd with LR -Seated LAQ without Rotation -Sit to Stand with Glutes/Quads -SLS/Step-Ups with Glutes
For more information on evaluation and treating hip conditions like these, be sure to check out the brand new course by TSPT, Management of the Hip, an in-depth lecture series on Anatomy & Biomechanics, Differential Diagnosis, Examination, Treatment, and more! Below is a trailer of what's offered in the course. -Dr. Chris Fox, PT, DPT, OCS 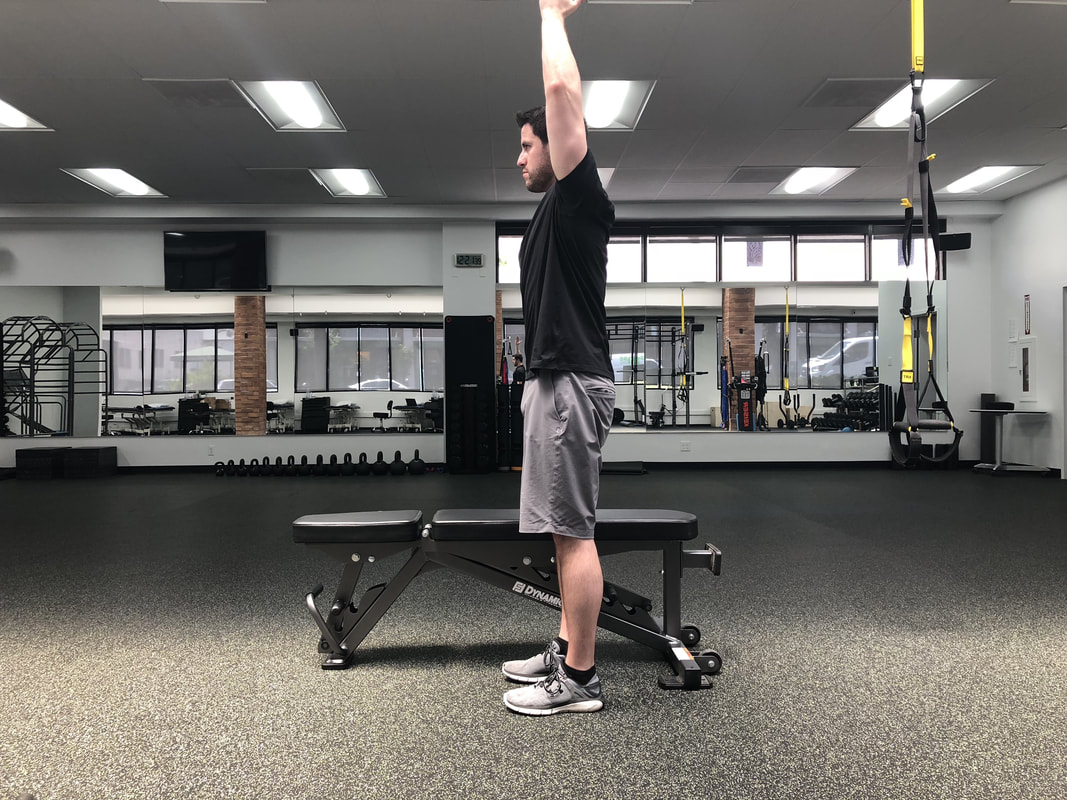 When you hear overhead athlete what do you think about? Do you think baseball or tennis player? Do you think about the weightlifter? Crossfitter? What about basketball? You see, there is many different types of overhead athletes. Yet, preparing these athletes can be both entirely different and also very similar. Many don’t consider basketball an overhead sport but next time you watch a basketball game take a closer look at the players blocking, dunking, and rising up for a shot. It is indeed an overhead sport. Furthermore, one of the greatest players to ever play the game, Kobe Bryant, underwent rotator cuff surgery late in his career. Again, just more evidence that the game of basketball is an overhead sport. So, what is it about the overhead athlete that is unique? Well, other than the lack of return to sport tests for the upper extremity, gaining end range stability is absolutely crucial for preparing them for their sport. Later in this article I am going to show you some of my favorite end range shoulder stability drills that I’ve had success with. These are drills that can be used across all of the athletes mentioned above (within your clinical reasoning framework of course). First, let’s talk about screening the overhead athlete. This step cannot be overlooked as this is the cornerstone to determine what our overhead athlete needs. For those of your who are also strength coaches, this is part of our “Needs Analysis” phase. There are a few must have screens for this part. The standing shoulder flexion screen gives us an overall first look at movement quality. Does the athlete have full range of motion? Is it smooth? Does the athlete substitute with the lumbar spine or forward neck? Is their rib flare? Pain? From here we can break down the motion in supine with a lat screen if the movement is limited. See the video below for an explanation on this. We can also look at subscapularis and pec minor tone and mobility here. Once we’ve established a baseline of movement quality and possible restrictions there are a few key muscles to look at testing. While I hate MMT’s, they serve a purpose at times. Looking at serratus anterior strength is one I often look at with this population. I will also look at middle trap, low trap, and RTC strength. Again, without some type of assessment it does not matter how “good” of an exercise it is or how “cool” it looks. There’s a lot of great exercises out there but they might not be appropriate for YOUR athlete. Assess, don’t guess. Now for the fun part. Once you’ve worked on ROM and basic strengthening you will want to start working on end range stability. I often see this phase botched and it’s a disservice to our overhead athletes because ultimately, we do have to load them to prepare the tissues and shoulder for more intense activity and their sport/positional demands. See below for a short list of exercises I use. For the complete list and progressions/regressions check out my full videos on our Insider Access page. My favorite OH exercises
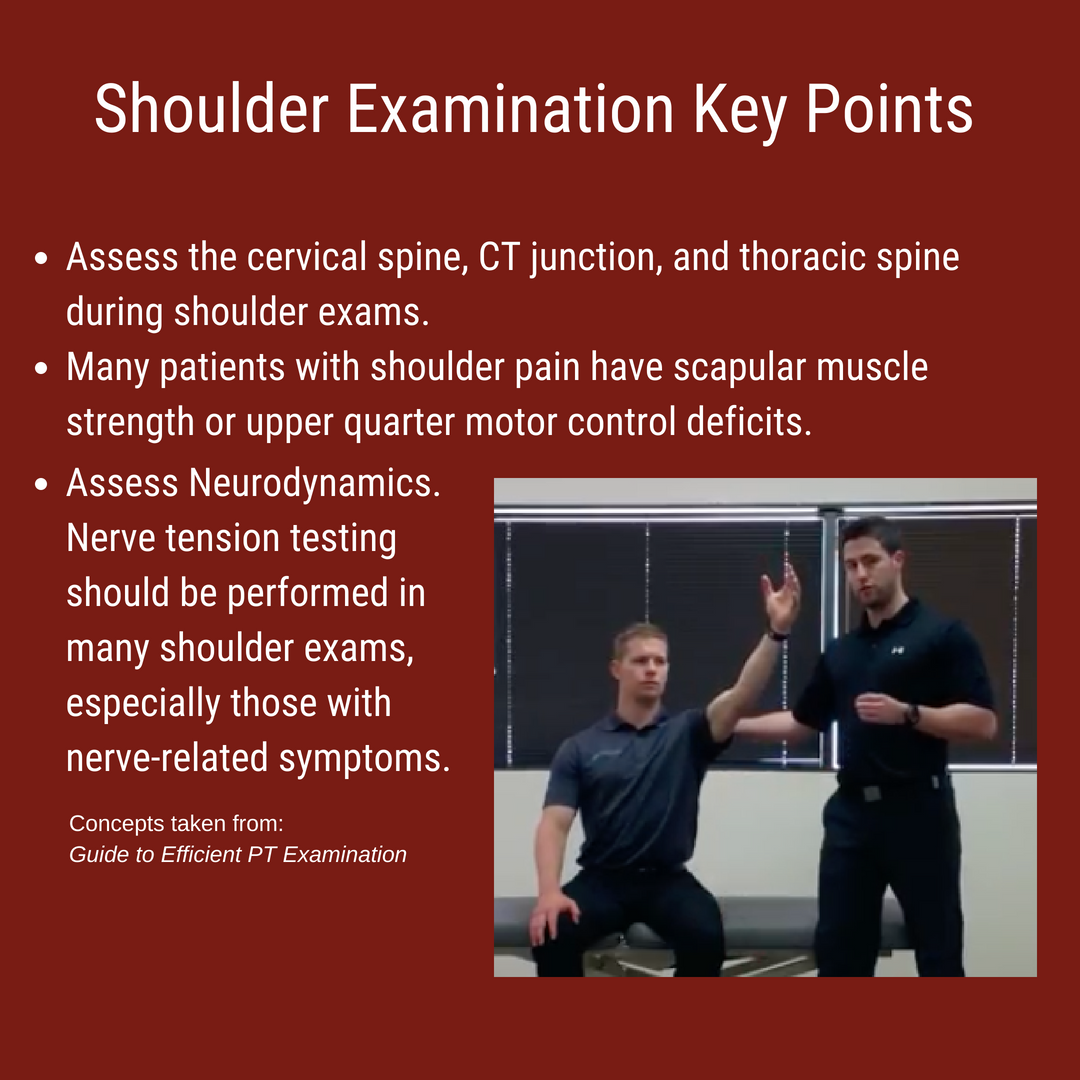
In physical therapy school, therapists are taught a broad spectrum of knowledge. Orthopedic examination, treatment, and prognosis is covered in-depth. For example, we learn more than 50 special tests to diagnose shoulder impingement, rotator cuff dysfunction, biceps pathology, and labral tears. Despite all this knowledge, therapists lack the ability to prioritize these tests. Many therapists gather information without considering ‘why’ we perform each measure. We soon realize that the special tests are not very special! Upon finishing their clinical examination, they are drowning in information that only minimally changes their patient’s prognosis or intervention selection. The therapist has found several secondary and tertiary impairments without identifying the primary cause of the problem. In this post, I am going to discuss how I perform a shoulder evaluation and review some of my regular day 1 shoulder exercises. Shoulder Examination: Efficiency and Reliability
Understanding the biomechanics can be a great starting point for assessing a painful region of the body. A lack of mobility or stability in any local region can impact one's pain perception, altering their response to stimuli. For new clinicians, it is important to develop an efficient and reliable examination. This combination of efficiency and reliability will minimize any redundancy of testing while maximizing time for treatment. Below is my template for performing an efficient examination. For the purpose of efficiency, it is divided by patient position. You will notice that only a few special tests are performed and the biggest focus is on assessing regional joint mobility. 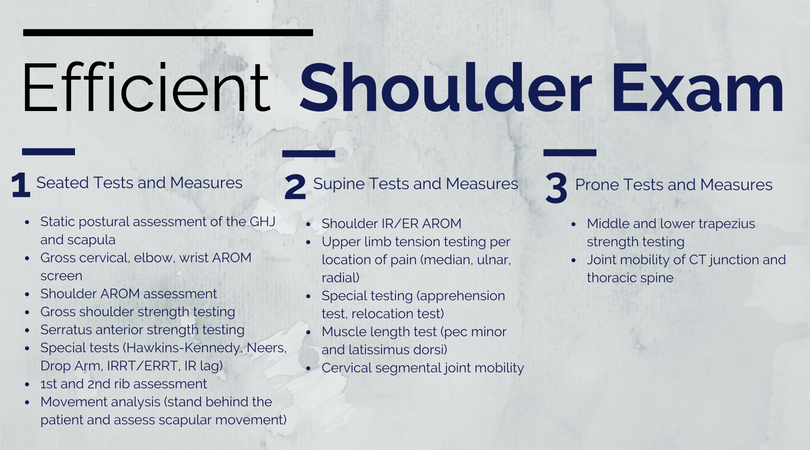 Shoulder Interventions: Day 1 Treatment and More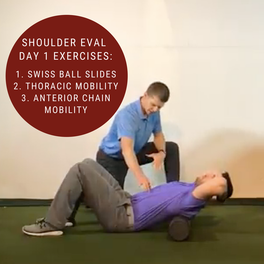 Upon completion of the shoulder examination, the next step is selecting appropriate interventions. From my clinical experiences, the shoulder joint is typically irritable in the acute stages. Therefore your exercise selection and manual interventions should address the patient's pain. My Day 1 interventions heavily focus on desensitizing the painful tissue through graded tissue exposure. Additionally, I spend a significant amount of time discussing the different mechanisms that impact pain. These exercises often include range of motion exercises and posterior shoulder muscle activation. If the patient has low irritability, further strengthening and mobility exercises can be initiated early in the plan of care. The video below discusses 3 common exercises I give to patients on the first day. If you find this video useful, I encourage you to check out our Insider Access pages. Questions or comments?
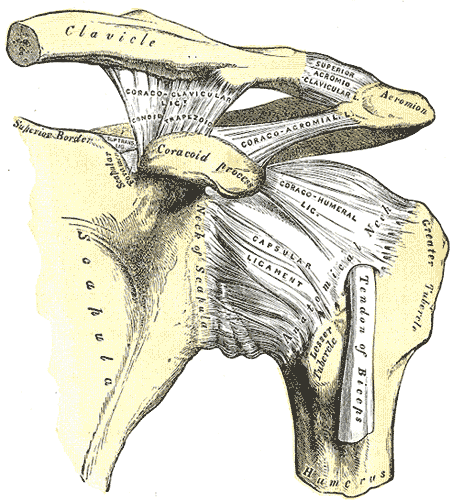
Let us know what initial interventions you typically use when working with shoulder patients! -Jim Heafner PT, DPT, OCS The shoulder is a complex region of the body as it is comprised of several different joints: glenohumeral, sternoclavicular (SC), acromioclavicular (AC), and scapulothoracic. In this post I will primarily be discussing the AC joint anatomy, joint mobility, and how to address movement restrictions in this region.
Kinematics The AC joint is primarily responsible for subtle adjustments of the scapula relative to the clavicle. The scapula upwardly rotates at the AC joint during shoulder flexion and abduction. It downwardly rotates during extension and adduction. With the horizontal plane, the AC joint permits some internal and external rotation. Additionally, the AC joint has slight anterior/posterior titling in the sagittal plane. It is important to remember that the majority of the AC joint kinematics are pretty minimal. Not much motion occurs here at all, but it is still important. Assessment and Treatment The AC joint is often responsible for the end-range elevation mobility in the shoulder. While this joint should always be assessed, it should definitely be considered when elevation mobility is restricted. Should there be an actual injury to the AC joint, it typically will present as pain over the joint and possible visual deformity. There are also several tests for AC joint injury, a couple (Active Compression Test and Horizontal Adduction Test) of which are shown below:
However, the AC joint is important to assess in non-AC joint shoulder pain as well. Consider the regional interdependence concept on a smaller scale: restriction in the AC joint or SC joint may lead to excessive motion and pain in the GH joint. Due to the planar alignment of the joint surfaces, it is recommended that a gliding assessment is used to simply determine if the area is moving or not. We will recommend using the directions of anterior-posterior and posterior-anterior when assessing to identify joint mobility stiffness. If restricted, you can use the same technique to mobilize it or some of the other ones shown in the video below: FREE PREVIEW OF THIS MONTH'S INSIDER ACCESS: AC JOINT MANUAL ASSESSMENT AND TREATMENT To help improve or retain mobility in the AC joint, I recommend some general mobility exercises or possibly some upper trap/serratus anterior strengthening to facilitate end-range elevation.
For more videos like this one on the AC joint, be sure to subscribe to Insider Access! -Dr. Chris Fox, PT, DPT, OCS  It's that time of the year again when nerves start to settle in for those who are taking this July's NPTE exam. I remember very distinctly the days leading up to the exam and I am sure you all share some of the same feelings. Am I ready? Did I study enough? Can I withstand the long test? Don't worry, these feelings are all normal. Chances are, you are more than prepared. You finished physical therapy school (which isn't easy) and you completed clinical rotations. That in itself is great prep for your exam. On top of that you've been studying for at least the last few weeks (hopefully). You're not going to be able to memorize or remember everything and thats OKAY. Nobody can remember everything and there will be some questions that you going to say "WHAT?". But rest assured, some of those questions are going to be thrown out because they are test questions for future exams. Still not convinced you did enough? Let me tell you about my story. I got into USC's sports residency in May of 2013. However, because my school's graduation date was after the date to apply for an out of state exam (I had to get finger printed, etc for California) I was not allowed to take the July exam. Which meant I had to stop studying and wait until October. Then, in late June I got a call that I'd been approved for the July exam after multiple people called on my behalf. Which meant that I had less than a month to study for this exam, move to California, get an apartment, and then take the exam! My final days before the exam were spent flying to Los Angeles, picking up my car 45 minutes away that I had shipped with all my stuff, and studying in between my Dad and I putting my apartment together to be functional. So trust me, you will be fine! Final Tips for the last week: - Review what you feel least comfortable about - Go to bed at the same time and wake up at the same time to get your body used to exam times - Get some good workouts in but don't exhaust your body - Don't experiment with any new food or drinks - Find something to take your mind off of the exam the night before (ex: a movie) - Wake up exam day and commit your mind that no matter what is thrown at you, today you are going to find a way to get the answers correct Good luck to all that are taking the NPTE! Dr. Brian Schwabe, PT, DPT, SCS, COMT, CSCS   So much information...so little time!!!The final weeks before the July 2018 NPTE exam are upon us! While this post is not about how to study, I do want to include my TOP piece of advice: As a general rule, I cannot stress enough the importance of taking practice exams and analyzing each question (both incorrect and correct answers). I took five or more practice exams and looked through every question thoroughly. Multiple times I found myself answering questions correctly, but using the wrong clinical reasoning. Other times, I would answer a question incorrectly, but had the proper thought process. These reviews will solidify the information you know and significantly improve your weak points. To read more about how Chris, Brian, and I prepared for the exam, click HERE. Whether you have been studying for 3 months, 3 weeks, or 3 days, this post is a friendly reminder to spend a little extra time on 3 important subjects. I break down each one below! Topic #1: Sensitivity, Specificity, and Likelihood RatiosWhile the direct 'research based' questions are <5% of the examination, it is important to know the difference between sensitivity, specificity, and likelihood ratios. These metrics are commonly seen on various examination techniques, and give practitioners an idea regarding how beneficial that test is clinically. Sensitivity refers to a test's ability to accurately rule out a disease and is scored between 0 and 1.00. Tests with high Sensitivity, rule Out a disease (SnOut). Specificity refers to a test's ability to accurately rule in a disease and is scored between 0 and 1.00. Tests with high Specificity, rule In a disease (SpIn). Positive and negative likelihood ratios work in a similar way but are not limited to numbers between 0 and 1.00. They act more as "persuasive information" and are more individualized than sensitivity and specificity (Jewell, 2010). Clinicians are required to determine a patient's pretest probability, then incorporate the likelihood ratio for the test and determine how "likely" the patient has the pathology. Keep in mind that the diagnostic accuracy applies to a specific patient population, and will change as other variables change. For example, the sensitivity and specificity of the Lachman's test is largely different in the acute phase of injury versus the chronic phase. Below is an example question from PT Final Exam: If a magnetic resonance image (MRI) correctly identifies 95% of patients as positive for anterior cruciate ligament tears, then the MRI is:
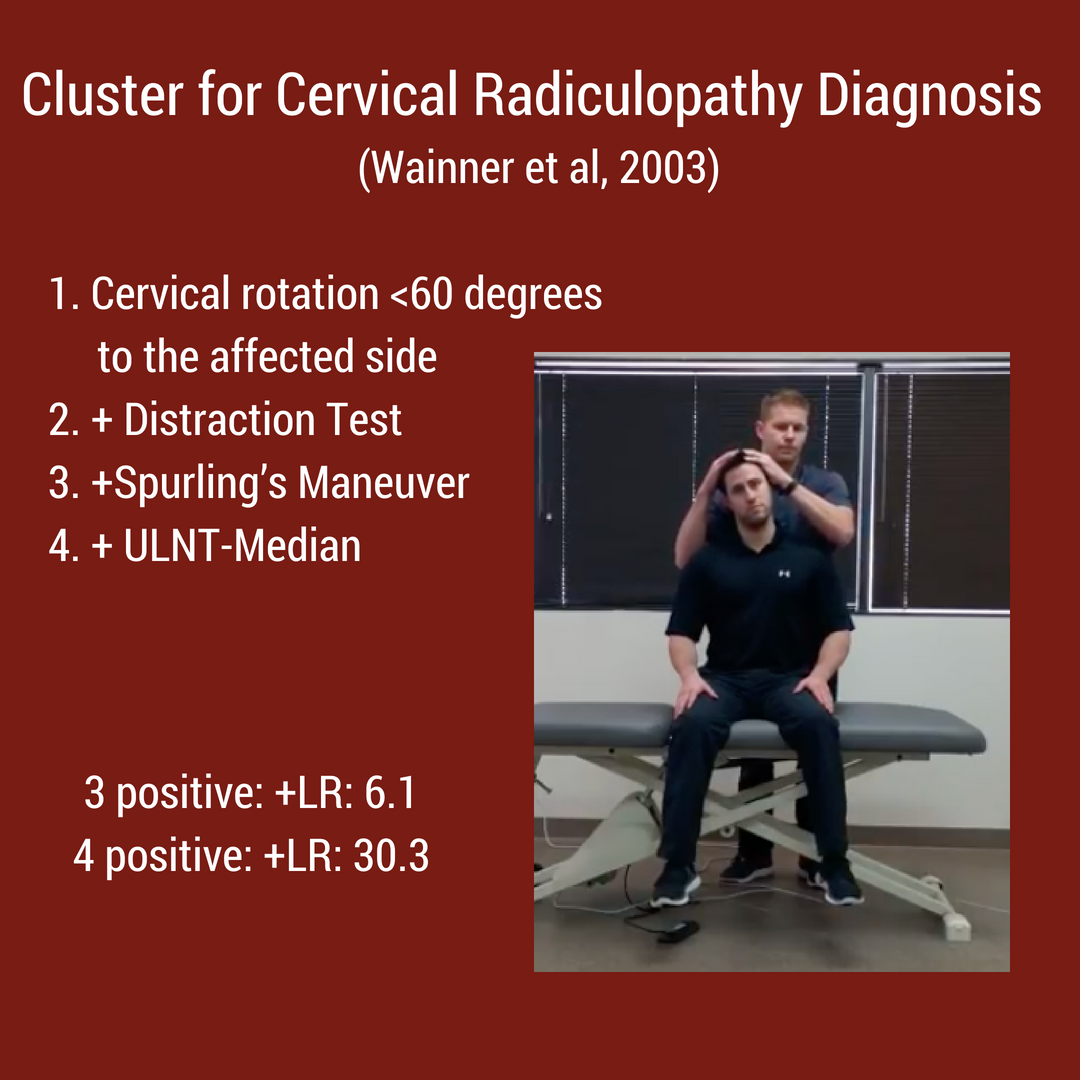
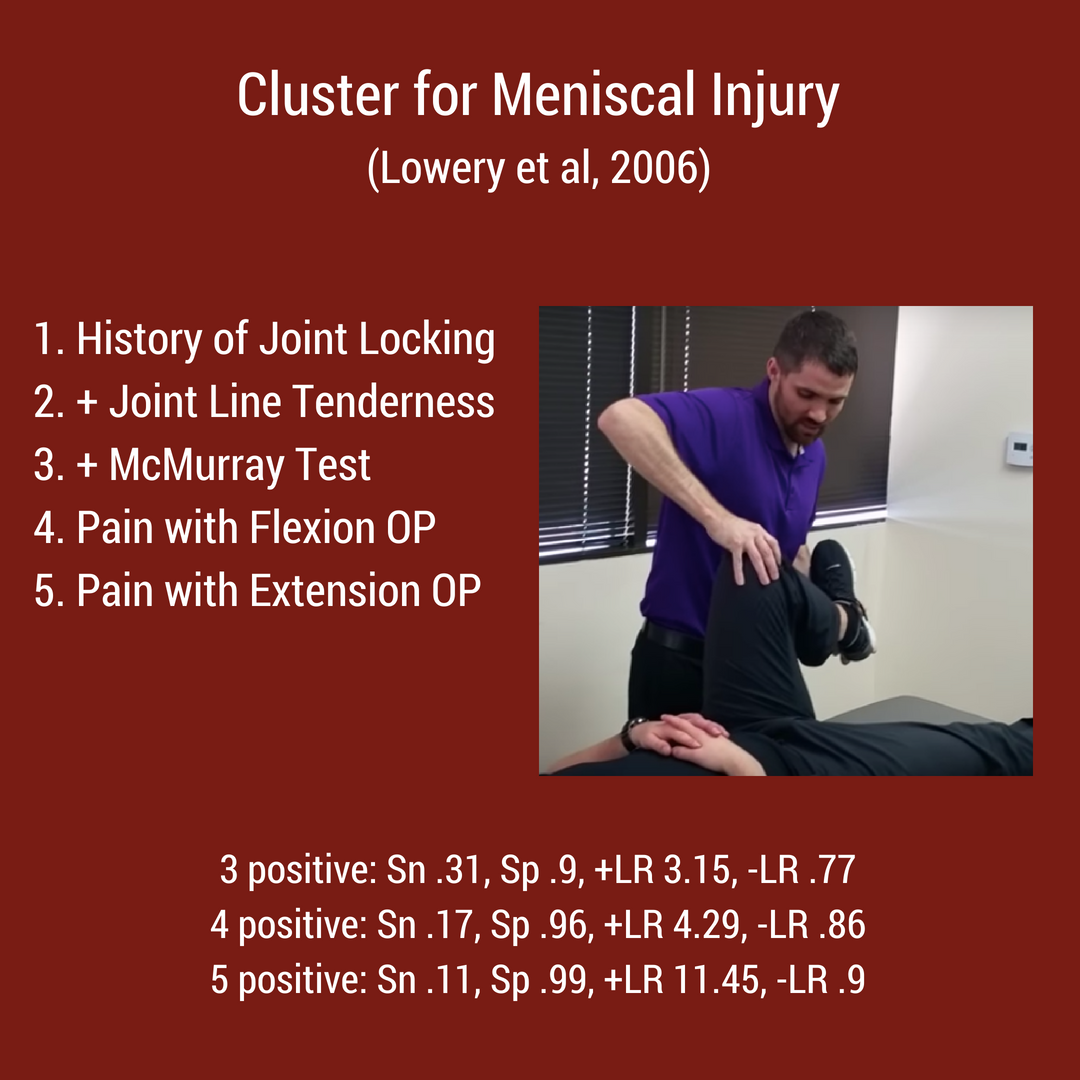
 Topic #2: Special Test ClustersFrom the rotator cuff to the menisci, there are multiple special test clusters that exam participants must review. While these tests may lack good diagnostic accuracy individually, when clustered together, their ability to diagnosis tissue pathology significantly improves. In addition to the special test clusters, I highly recommend looking at Wells Criteria for a Deep Vein Thrombosis, the Ottowa foot and ankle rules, and hip/ knee arthritis criteria. Below are 4 major clinical clusters that are important for the NPTE.
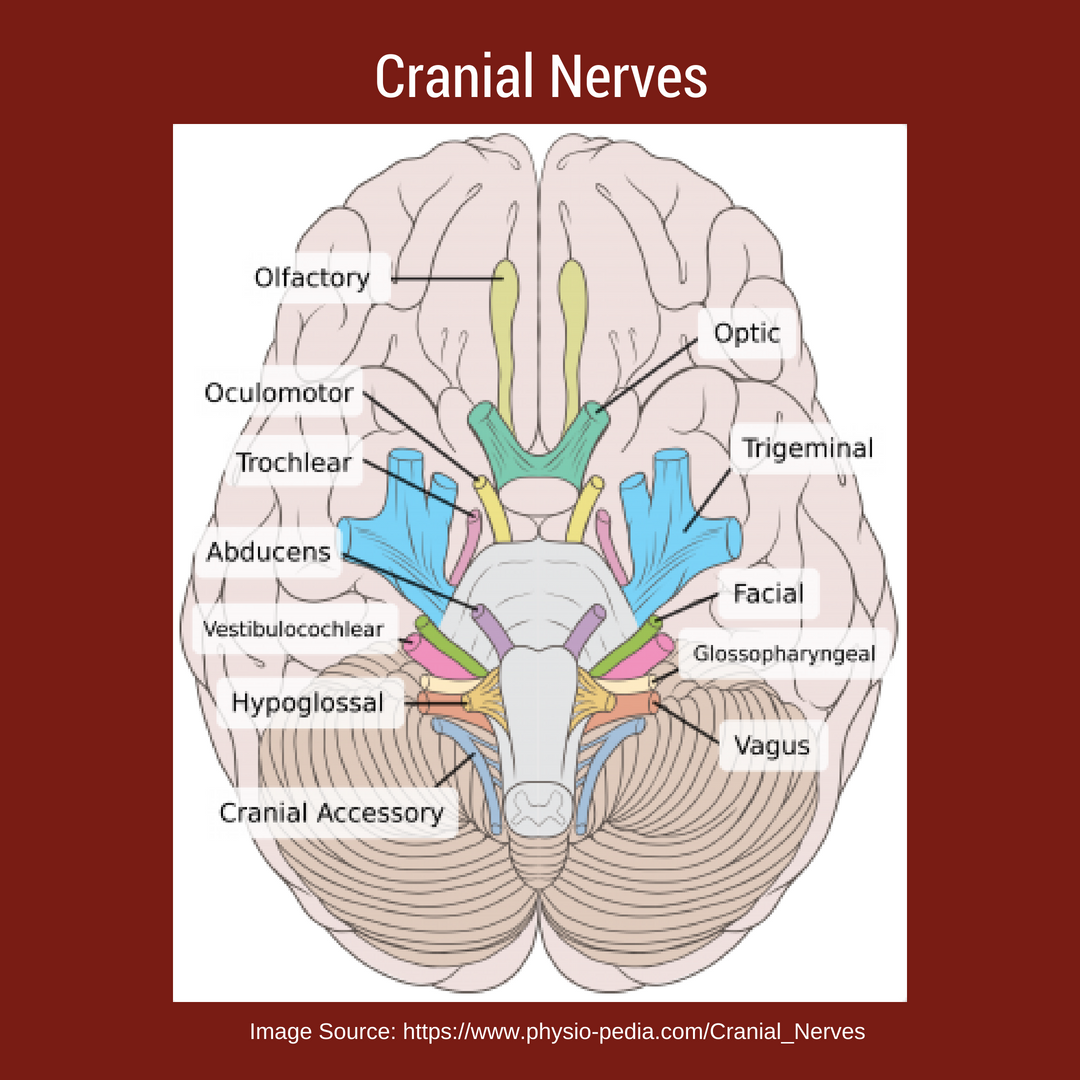
Topic #3: Cranial NervesWhile TSPT blog has a few posts on the cranial nerves, I have referred to our friends over at physiopedia for more in depth information. There will be test questions on the cranial so you must know each one and their function. "There are 12 pairs of cranial nerves and they are numbered according to their position of where they originate in the inferior surface of the brain...The names of the cranial nerves sometimes correspond with their individual function. The cranial nerves are comprised of axons that are either sensory, motor or both." [Reference: Cranial Nerves]. Watch the video below to learn more!
Best of luck on your final weeks studying for the NPTE! Jim Heafner PT, DPT, OCS
Your athlete comes into see you and has bruising and pain around the lateral ankle, extending down to the foot. He reports that he was at basketball practice and turned his ankle pretty hard. He has a history of lateral ankle sprains and presents with increased swelling consistent with a lateral ankle sprain. Yet, he complains of pain along the lateral aspect of his foot and some pain on the plantar side. The above scenario is something I have seen many times. Just last year I had a NBA draft prospect that sprained his ankle during a draft workout but was not getting better and had trouble walking. By the time I saw him he was 6 weeks from date of injury and struggling to understand why his ankle sprain wasn't better. There was a slight prominence on the plantar side of his foot about where the cuboid was. He had lots of pain with walking and weight bearing with pinpoint pain around the cuboid. I performed a cuboid whip and he immediately had relief of pain. Cuboid syndrome is an often overlooked diagnosis with lateral ankle sprains and lateral foot pain. Cuboid whips are a very effective treatment for these type of injuries. Signs of cuboid syndrome often go unnoticed because of similarity to ankle sprains. Some of the more common signs include:
Learning to effectively treat ankle sprains and cuboid syndrome with manual therapy can be very beneficial. Check out the video below to learn how to perform some of mobilizations and manipulations of the foot! Learn how to perform some of the most beneficial mobilizations and manipulations of the mid-foot/forefoot Dr. Brian Schwabe, PT, DPT, SCS, COMT, CSCS Board Certified Sports Physical Therapist Learn more at Insider Access
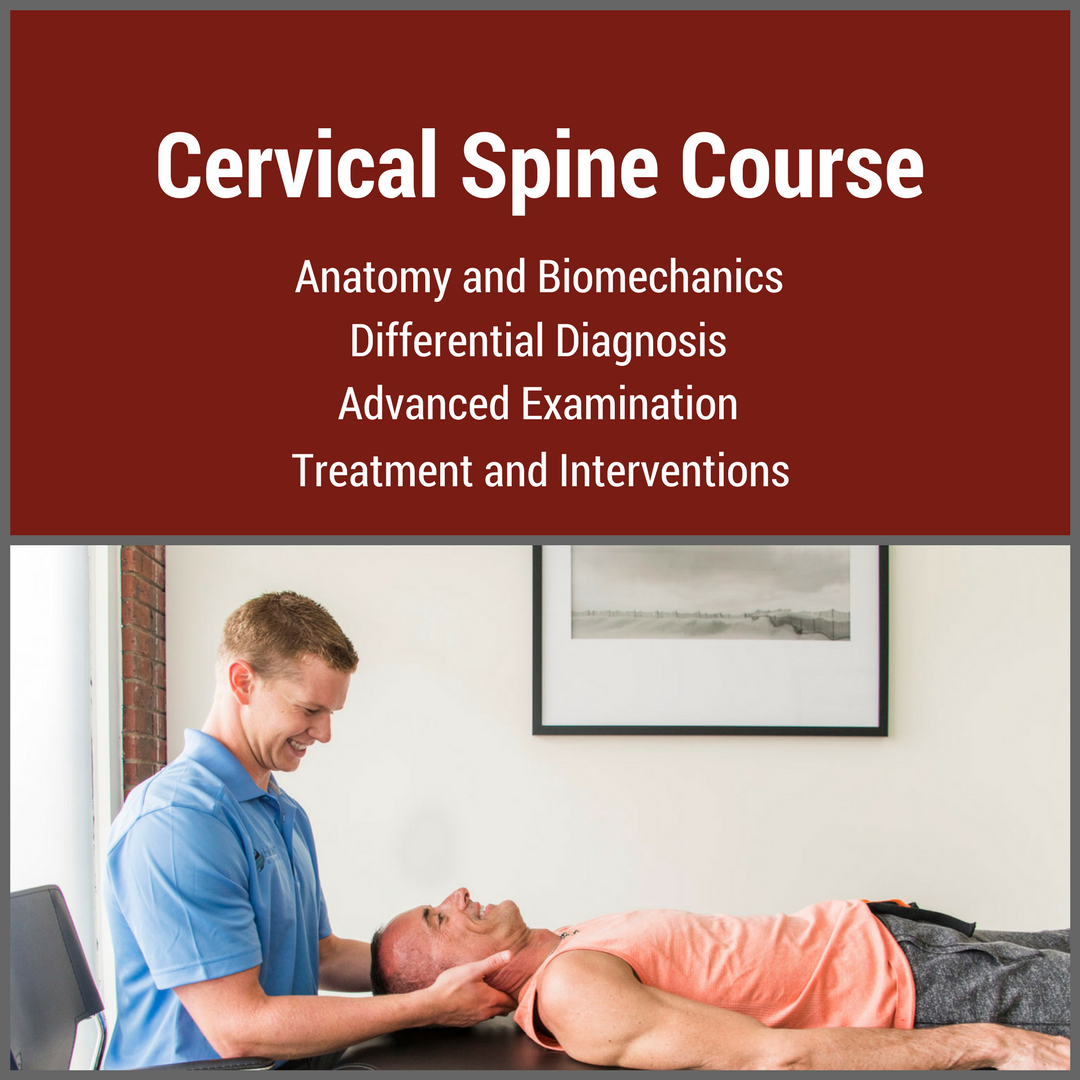
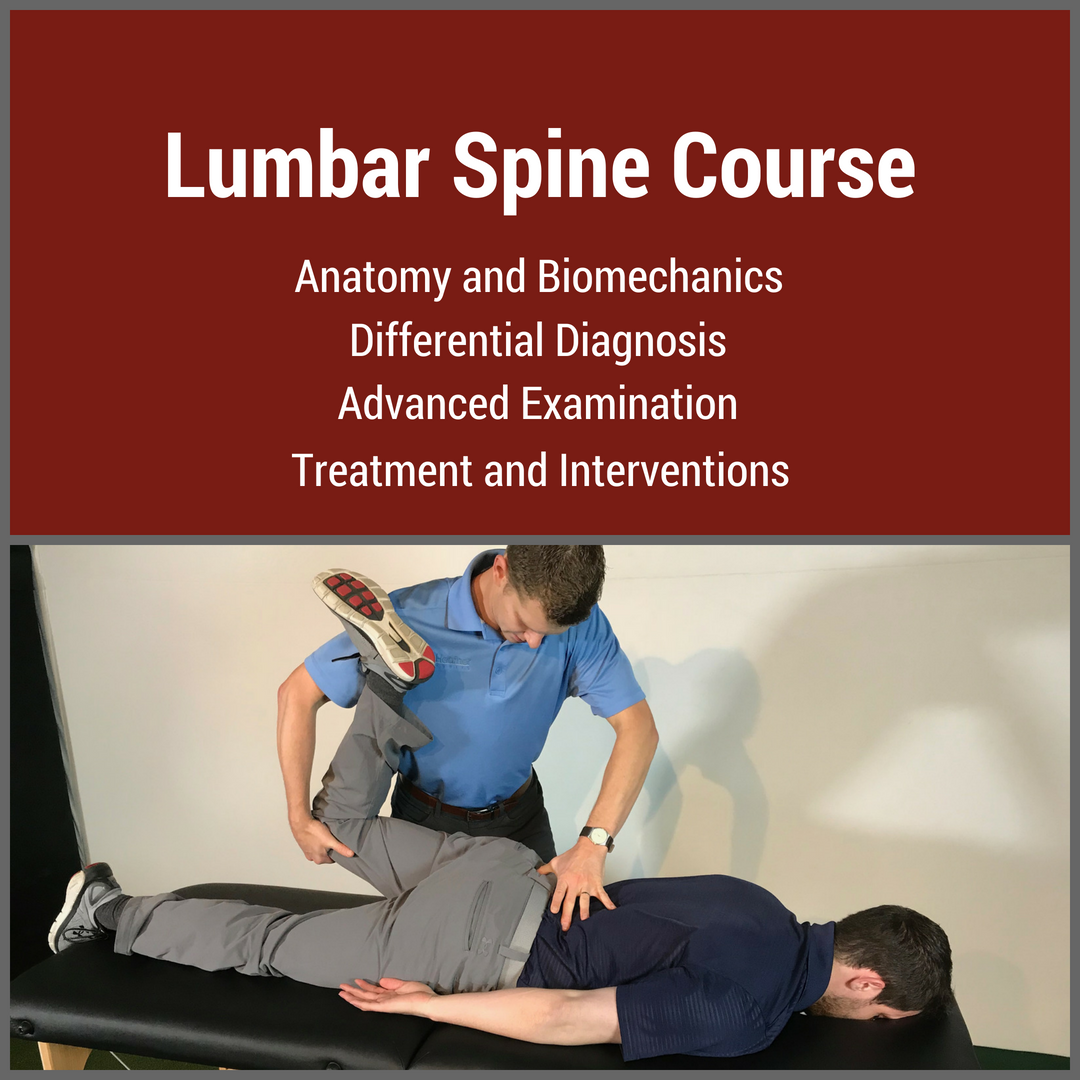
July is here! This means that we are nearing the next National Physical Therapy Examination (NPTE) that is offered quarterly (July 24-25). After going to graduate school for three years to become Doctors of Physical Therapy, your ability to practice is determined by the NPTE. While the purpose of physical therapy school is to prepare clinicians to safely and effectively rehabilitate patients, the direction of school is developed to prepare students to pass the NPTE. Even with three years of schooling, the examination can be intimidating due to its length and significance. In this article, I will review various study methods and recommendations for the examination.  ResourcesThere are many different resources available to make studying for the examination a little less frightening. For starters, the primary prep books include Scorebuilders and TherapyEd. Each of these texts are updated annually to stay in line with the NPTE. They come with overall content summaries (Scorebuilders with various charts is easier on the eyes and TherapyEd is more outline based) and sample tests at the end of the book. The content summaries, while useful, are not typically sufficient by themselves. It is recommended that you take each topic in the book with which you are unfamiliar and expand upon it with either textbooks or notes from school. The most useful component of the books is the sample examinations and answers. These examinations and answer explanations provide reasoning as to why certain answers are viewed as correct and others are "not as correct" (it is essential to remember that the exam often looks for the best answer available, not necessarily the true best answer). The exams will also give you an idea of how prepared you are overall for the NPTE and which specific areas you are deficient (there is an item analysis and breakdown after you complete each sample test). Both Scorebuilders and TherapyEd exam questions tend to be harder than the NPTE (the PEAT questions are most similar to the NPTE), but TherapyEd has the hardest questions. Because of this, I personally preferred TherapyEd as I like to be over-prepared for exams (I like to approach a difficult test and feel that it ends up being easy by comparison). There are several supplemental resources available as well. Both Scorebuilders and TherapyEd offer flashcards as a studying tool. If you are a flashcard user typically with studying, these may be useful. These companies also offer study prep courses that can be attended in-person. I attended the TherapyEd course, which while useful for understanding overall components of the exam, did not help in understanding actual content (that studying is left up to the individual). Finally, there are other companies that offer online prep courses and mentoring, such as PT Final Exam. Often these courses provide a timeline for studying the content, regular sample exams and feedback on areas to improve and methods for studying. Whatever resources may be best for you likely depend on your studying habits. Content FocusAs a general rule, it is recommended that the primary studying focus on the "Big 3." Somewhere around 60-70% of the NPTE questions will be based off the Musculoskeletal, Neuromuscular, and Cardiopulmonary subjects. They may include interventions, foundational information, examination or any other subtopics, but those three subjects comprise the majority of the test. With that said, studying should focus on these areas and add in the other subjects (i.e. modalities, ethics, etc.) as you feel more confident with the major topics. Should you feel confident in any specific area, you can spend less time studying that subject. I felt much more knowledgeable with the Musculoskeletal content, so I focused on the other two. The item analysis from the practice exams is perfect for finding those areas of weakness and strength, so it may be beneficial to take a baseline practice test and then at various intervals so you can continue adjusting your studying focus as you move closer to the NPTE. If you are short on studying time, focus primarily on the "Big 3" and touch up with the remaining areas of weakness. 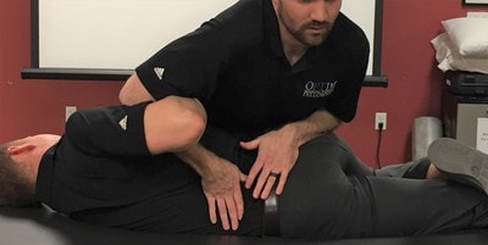 Study TacticsGenerally, I recommend using the study tactics that you found successful when going through school. If you did well studying in groups, study in groups. If you did well with using flashcards, use flashcards. If you took longer to study for an exam, start earlier. I recommend starting with a practice exam to establish your baseline strengths and weakness. From that point, make sure you make the "Big 3" strengths and then move onto the other areas. Use the test prep book as your foundation for studying. I recommend working your way through each section and expanding upon a specific diagnosis, intervention, etc. using your class notes or text books. When you go through the practice exams, not only do you want to see why certain answers are wrong and certain answers are correct, but keep a mental log of the type of questions that are asked. This may redirect how you have been assessing and studying each topic. Finally, I recommend setting a schedule to study the content with more time allotted for the larger areas and some time left over leading up to the exam for final review and "touch up." This will keep you on task and ensure you cover the necessary material. While preparing for the NPTE, it is essential to take time to exercise, reflect/meditate, and relax. Whatever you use for stress relief will only facilitate your studying. The evening before the exam, I recommend taking it easy (don't cram!) and do something enjoyable: go out to eat with some friends, watch a movie, distract yourself from the exam and allow mind to rest as it prepares for the big day. If you have any other specific questions about how to prepare for the NPTE, feel free to reach out to us as we would be more than happy to help you make that transition to a licensed physical therapist! -Dr. Chris Fox, PT, DPT, OCS Interested in Learning More?Check out our Cervical and Lumbar Courses (on a 50% SALE until 7/5/18)
Understanding hindfoot mechanics is tough! Unlike the shoulder or knee joint, the multiple joints in the foot and ankle complex do not follow standard concave/convex arthrokinematic patterns. Additionally, the complex mechanics change whether or not the individual is in an open or closed kinetic chain. For example, movement at the subtalar joint consists of the triplanar motions of pronation and supination.
Talocrural Joint The foot and ankle consists of 26 bones and 100 distinct muscles, ligaments, and tendons. The rearfoot (a.k.a hindfoot) primarily refers to the talus and calcaneus bones of the foot. The talus articulates with FOUR seperate bones- the tibia, fibula, calcaneus, and navicular bones. The superior articulation between the talus and tibia/fibula is known as the talocrural joint. The talocrural joint is a uniaxial synovial joint connecting the distal tibia to the talus. While many people view the talocrural joint as only a hinge joint, others authors argue that it is more complex due to the composite internal and external rotation that occurs during dorsiflexion and plantarflexion respectively. For the purpose of this post, the primary movements at the talocrural joint are plantarflexion and dorsiflexion. The average individual has approximately 15-20 degrees of dorsiflexion and 50 degrees of plantarflexion. These motions are often limited due to inadequate stress and load through the joint. Subtalar Joint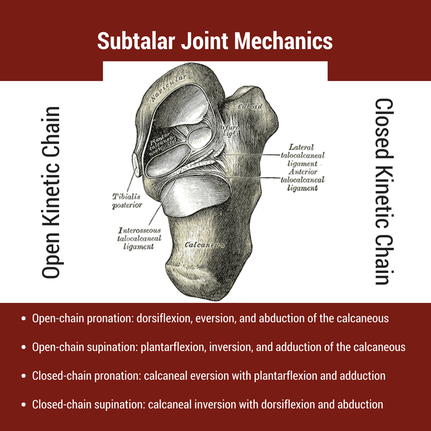 The subtalar joint (a.k.a. talocalcaneal joint) is comprised of the talus and calcaneus bones. As described in the introduction, the primary motion at the subtalar joint is pronation and supination. However, pronation and supination are not simple movements- both consist of 3 distinct movements, which changes depending on the foot's location to the ground. During ambulation, closed chain pronation must occur during the stance phase. This motion consists of calcaneal eversion combined with talus adduction and plantarflexion. This is described nicely in a post from the Gait Guys, "In a perfect biomechanical world, shortly following initial contact with the ground, the calcaneus should evert 4-8 degrees, largely because the body of the calcaneus is lateral to the longitudinal axis of the tibia. This results in plantar flexion, adduction and eversion of the talus on the calcaneus, as it slides anteriorly. At this point, there should be dorsiflexion of the transverse tarsal (calcaneo-cuboid and talo-navicular joints). Due to the tight fit of the ankle mortise and its unique shape, the tibial rotates internally (medially). This translates up the kinetic chain and causes internal rotation of the femur, which causes subsequent nutation of the pelvis and extension of the lumbar spine. [Citation: Gait Guys]" The subtalar joint must have adequate mobility to allow for proper structure of the arch. When motion is restricted, mobility issues often arise in the midfoot or at the talocrural joint as a compensatory strategy (see treatment video below).
Hindfoot Mobility: Foot Assessment and InterventionsThe human body must be able to adapt to all types of surfaces- hard, soft, even, and uneven. For this reason, we cannot solely look at one joint or one motion. As human beings we must perform all motions in harmony. While each of these movements may not have an impact on one's pain, understanding the kinematics can help with clinical reasoning and decision making! In the video below, I discuss variations in rearfoot posture, the impact on foot mobility, and how I incorporate these variations into my treatment. [this video comes from our insider access library!] Interested in Learning More? |


 |  |
Dr. Brian Schwabe's NEW Book in partner with PaleoHacks!

Learn residency-level content on our
Insider Access pages
Insider Access pages


We value quality PT education & CEU's. Click the MedBridge logo below for TSPT savings!
Archives
July 2019
June 2019
May 2019
March 2019
February 2019
January 2019
December 2018
November 2018
October 2018
September 2018
August 2018
July 2018
June 2018
May 2018
April 2018
March 2018
February 2018
January 2018
December 2017
November 2017
October 2017
September 2017
August 2017
July 2017
June 2017
May 2017
April 2017
March 2017
February 2017
January 2017
December 2016
November 2016
October 2016
September 2016
August 2016
July 2016
June 2016
May 2016
April 2016
March 2016
February 2016
January 2016
December 2015
November 2015
October 2015
September 2015
August 2015
July 2015
June 2015
May 2015
April 2015
March 2015
February 2015
January 2015
December 2014
November 2014
October 2014
September 2014
August 2014
July 2014
June 2014
May 2014
April 2014
March 2014
February 2014
January 2014
December 2013
November 2013
October 2013
September 2013
August 2013
July 2013
June 2013
May 2013
April 2013
March 2013
February 2013
January 2013
December 2012
November 2012
October 2012
September 2012
August 2012
Categories
All
Chest
Core Muscle
Elbow
Foot
Foot And Ankle
Hip
Knee
Manual Therapy
Modalities
Motivation
Neck
Neural Tension
Other
Research
Research Article
Shoulder
Sij
Spine
Sports
Therapeutic Exercise
 RSS Feed