
|
Cervical spine pain is one of the more common complaints seen in outpatient orthopaedic physical therapy. With the relation to the rest of the upper quarter, the shoulder and thoracic spine, it is essential we be as proficient as possible when assessing and treating the region. While this may seem obvious, it is interesting to note how hesitant some clinicians are in treating the upper cervical spine. Why? Because it is different and there is risk for fatal injury. The upper cervical spine is made up of the Atlantooccipital Joint and the Atlantoaxis Joint. These joints have different anatomical and kinesiological considerations compared to the rest of the cervical spine. With the frequency with which the cervical spine is involved in upper quarter dysfunction, as well as temporomandibular dysfunction, it is imperative we have a solid understanding of the joints. 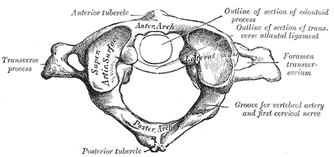 Atlantooccipital Joint The Atlantooccipital Joint (AO) is made up of the atlas and occiput. The atlas has no body, pedicles, laminae, or spinous process, unlike typical vertebrae. There is an anterior arch with an anterior tubercle for attachment of the anterior atlanto-occipital membrane (Neumann, 2010). The posterior arch is larger and has a posterior tubercle. Additionally, there are two large transverse processes that are palpable between the mastoid process and mandibular ramus. There are two large concave facets that face medially and superiorly in order to accept the occipital convex condyles that face inferiorly and laterally (Abernethy, 2014). The atlanto-occipital membrane connects the anterior portion of the foramen magnum to the anterior arch of C1 for anterior-posterior stability. The posterior atlanto-occipital ligament connects the posterior ring of C1 to the occiput at the foramen magnum as well. This ligament is important for anterior translation of C1 and vertical translation of the occiput. Additionally, there are joint capsules surrounding the AO joints that limit movement in each direction. There are 2 degrees of freedom in the AO joint: flexion/extension and frontal sidebend (Abernethy, 2014). The OA joint is responsible for 10 degrees of flexion, 25 degrees of extension, 5 degrees of sidebend, and 4 degrees of conjugate rotation. To fully comprehend the arthrokinematics of the AO joint, we must know the plane of the joint. During flexion, there is a bilateral lateral, posterior, and superior (LPS) motion, while there is a bilateral medial, inferior, and anterior motion for extension (MIA). In order to determine which part and which side of the joint is restricted, we assess sidebend. Upper cervical sidebend to the left, results in left AO MIA and right AO LPS. In other words, if you sidebend the upper cervical spine to the left, you are essentially flexing on the right and extending on the left. To determine which side is at fault for the motion restrictions, sidebending should be reassessed in flexion and extension. For example, if sidebending to the left feels restricted in neutral, it is possible that either flexion on the right or extension on the left (or both) are limited. In a normal joint, sidbending should be smooth and through an axis that runs through the tip of the nose. When placed in flexion (of the same restricted motion), sidebend to the left now biases the right joint. By initially placing the AO joints in flexion, the condyles are moved lateral, posterior and superiorly (LPS). Thus, if there is a restriction on that right side, the condyle will meet its barrier sooner compared to neutral. By placing the AO joints in extension, the condyles are then moved medially, inferiorly, anteriorly (LIPS). This forces the condyle on the left to meet its barrier sooner compared to neutral if there is a restriction. Typically, a flexion limitation is found due to the frequency with which we see forward head posture. If you find an extension limitation, I recommend re-checking the joints.
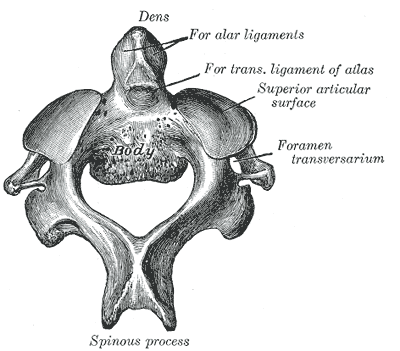
The axis of rotation is through the dens. When rotating to the left, the ipsilateral side of the atlas glides posteriorly, while the contralateral side glides anteriorly (Abernethy, 2014). The AA joint is responsible for 35 degrees of rotation bilaterally, 8 degrees of flexion, and 10 degrees of extension. There are two methods that are commonly used for assessing motion at the AA joint. One is the Flexion-Rotation Test, where the cervical spine is maximally flexed (and maintained there), while rotation is performed bilaterally. The issue with this test is that it tends to also include motion at the C2-3 joint, resulting in at least 45 degrees of rotation in a normal joint bilaterally. To truly assess AA rotation, maximally sidebend the cervical spine ipsilaterally and rotate contralaterally, while maintaining chin tuck (if chin tuck is lost, isolation to C1-2 is lost). This is also a position for manipulation. It should be noted that in those with moderate degeneration of the cervical spine (and presents of significant osteophytes), cervical sidebend may be limited, resulting in decreased ability to isolate the AA joint. Ligament and Artery Testing People are often wary of treating upper cervical dysfunction manually due to some of the potential risks for fatal injury. The cervical vertebrae house the spinal cord and vertebral arteries - structures that are necessary for ordinary brain and motor function. Therefore, we must assess two areas: stability and blood flow. It is recommended that stability is assessed first due to the end range positions required for vertebral artery testing. The two ligament tests required are the Transverse Ligament Test and the Alar Ligament Test. The transverse ligament runs from one side of the arch of C1 wrapping around the dens to the other side of the arch of C1 (Abernethy, 2014). This ligament is 7-8 mm thick and keeps the dens in contact with the atlas, preventing anterior dislocation. The alar ligaments run superiorly and laterally from the dens to the occiput, resisting posteiror translation of the dens and occipital rotation contralaterally. If any of the tests are positive, a provocation of neural symptoms may occur. Structural stability of the atlas may also be assessed by compressing the transverse processes of C1 medially at the same time. If movement is detected, there lies the possibility of a Jefferson fracture. This often occurs with an axial blow to the head. Once instability has been cleared, we must check the patency of the vertebral arteries, as the vetebrobasilar system is responsible for 11% of blood flow. The vertebral artery branches off the subclavian and passes superiorly with the longis colli, enters the transverse foramen usually at C6 (but anywhere between C4-7), wraps back around the articular pillar and enters the posterior AO membrane, before entering through the foramen magnum. Here it joins the opposite vertebral artery to form the basilar artery. Vertebrobasilar Insufficiency is assessed with the Vertebral Artery Test. If you look at the diagnostic accuracy of the test, it would appear there isn't really a reason to even perform the test. With a sensitivity of 0% and a specificity of .67-.9%, a negative test means absolutely nothing and a positive test means the patient may have vertebrobasilar insufficiency. Positive symptoms include: dizziness, diplopia, dysarthria, dysphagia, drop attacks, nausea and vomiting, sensory changes, nystagmus, etc. While the diagnostic accuracy is poor for this test, there is still a common perception in the medical community that it is a "good" test for VBI. If you perform some manual therapy technique and the patient has a reaction and you did not perform the test, you will likely be found guilty of negligence. So perform the test. As with our normal exams, remember to screen for other potential non-musculoskeletal causes for dysfunction by assessing things like dermatomes, myotomes, reflexes, BP, pulse, respiratory rate, etc. 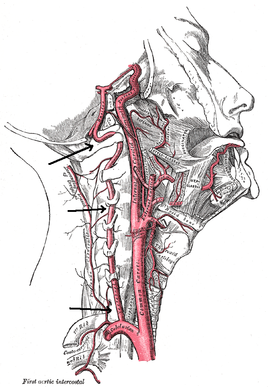
As you can see, the upper cervical spine is not as difficult to assess as we make it out to be. Using the anatomy of the joints and our understanding of the kineseology, we can determine where/if any mobility restrictions exist. We can then proceed to couple that with our typical cervical spine assessment to find any strength/motor control limitations that contribute to dysfunction. The upper cervical spine is an important region to regularly assess due to its potential to contribute to TMJ and upper quarter dysfunctions. Any hypo/hyper-mobility can result in altered muscle tone or nerve firing patterns. These can result in altered kinematics in neighboring joints or altered joint alignments, such as an elevated 1st rib. Do not let the fear of VBI or instability prevent you from performing a complete evaluation and assessment. References:
Abernethy, Jeff. "Upper Cervical." Upper Cervical Spine Orthopaedic Residency Lecture. Scottsdale Healthcare Osborn Campus, Scottsdale, AZ. 9 January 2014. Lecture. Neumann, Donald. Kinesiology of the Musculoskeletal System: Foundations for Rehabilitation. 2nd edition. St. Louis, MO: Mosby Elsevier, 2010. 315-322. Print.
10 Comments
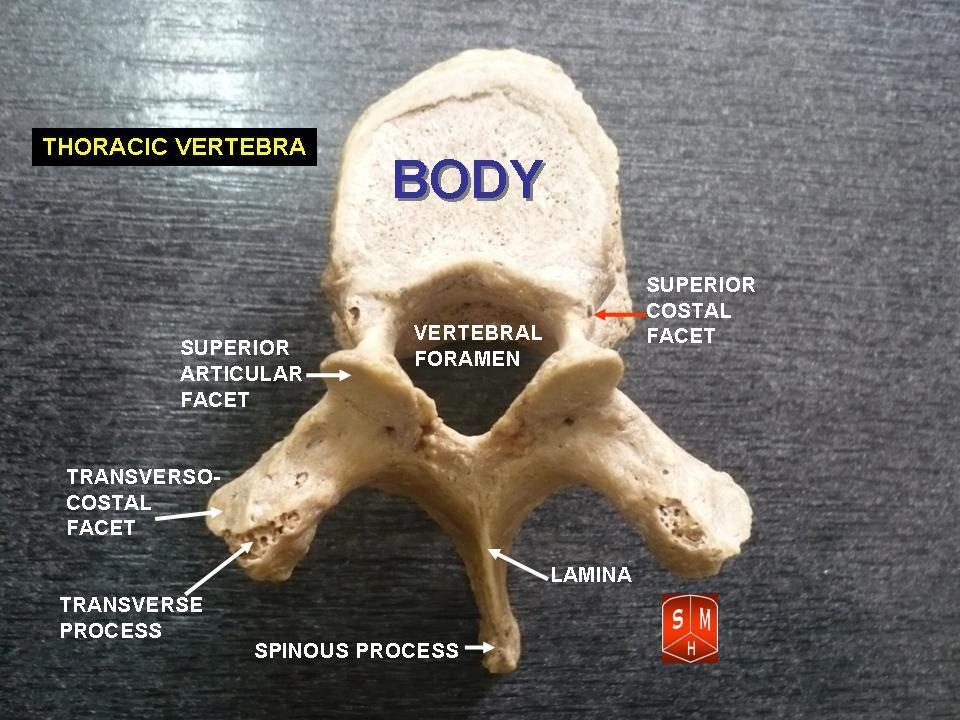
Anatomy: One of the first things to remember is that the thoracic spine is comprised of 12 vertebrae. These vertebrae have similar characteristics of the other vertebrae: a vertebral body (disk to vertebral body height ratio is 1:5), pedicles directed posterior from the body, lamina that connect to form a spinous process, and facets (Neumann, 2010). The transverse processes are directed posterolaterally and the spinous processes fall inferiorly (depending on the region), so that they are at the level of the transverse processes below. This is an important consideration for palpation. T1-3 and T10-12 actually have their spinous processes at the same level as the transverse processes (Egan et al, 2011). The spinous processes of T4-T6 fall half a level below the transverse processes, while T7-9 spinous processes fall a full level below the transverse processes. The pedicles actually sit directly posterior from the vertebral body, making the vertebral canal narrower here compared to other parts of the spine. T4-9 is known as the critical zone because the vertebral canal is narrowest here; it also has reduced blood supply (Egan et al, 2011). T6 is a tension point; here motion of the spinal core versus canal converge in different directions. The superior and inferior facets in the thoracic region are oriented about 60 degrees from the horizontal plane and 20 degrees from the frontal plane with the inferior facets facing anteriorly, inferiorly, and slightly medially; the superior facets face posteriorly, superiorly, and slightly lateral. Something to consider is that there is no immediate change between cervical to thoracic vertebrae and thoracic to lumbar vertebrae. The superior thoracic vertebrae bare qualities similar to the cervical spine and the inferior thoracic vertebrae resemble the lumbar spine.  Ribs: You cannot discuss the thoracic spine without considering the ribs as they attach in this region. There are 12 ribs (usually) in the body, just as there are 12 thoracic vertebrae. Ribs 1-7 are true ribs in that they attach directly to the sternum in the front of the body (Neumann, 2010). Ribs 8-12 are false ribs. Ribs 8-10 join in cartilage before attaching to the cartilage of the 7th rib. Ribs 11 and 12 are floating ribs and have no ventral attachments. Ribs 3-9 have demifacets on the thoracic vertebrae for attachment that span 2 vertebrae. Ribs 1, 11, and 12 have one facet on the corresponding vertebrae. The 2nd rib attaches to both T1 and T2 vertebrae. Additionally, ribs 1-10 have facet attachments at the costotransverse joints, while ribs 11-12 lack these as "floating ribs." Above T7, the rib portion of the costotransverse joints are concave, allowing for more rotation compared to the planar joints of the below T7 (Egan et al, 2011). The sympathetic chain lies on the anterior side of the rib heads next to the costovertebral joints. Clinical Implications: As stated previously, the fact that the thoracic spine connects the cervical spine to the lumbar spine is reason alone that this anatomical area should be considered for treatment. Think about the impact of posture. In most patients that sit for prolonged periods with a forward head posture, the anterior shift of the center of gravity places an excessive flexion moment arm to the thoracic spine, furthering the already kyphotic thoracic spine. As with any tissue, prolonged stress and creep eventually leads to pain when the tensile stiffness is no longer sufficient and the patient experiences pain. Training postural muscles is key to encouraging a more neutral posture that does not stress the tissues excessively. Consider facet restrictions: Limited joint mobility in one location often leads to hypermobility and pain in other regions, either nearby or distant. A joint dysfunction can often lead to hypertonic/painful muscle tissue near the joint as well. We can treat these restrictions with manual therapy. Two conditions less commonly discussed but seen relatively often include rib dysfunction and neural tension. Rib impairments are typically considered after a blow to the side or pain with breathing, but that is not always the case (making it harder to identify). A partially subluxed or restricted rib can be quite painful and present as thoracic paraspinal pain or even stomach pain as the tip of a floating rib presses against the anterior tissue. A potential location for pathology and treatment of neural tension is the thoracic spine. Remember that the thoracic spine contains the critical zone where the vertebral canal is narrowest. The spinal cord can easily become compressed here leading to pain/neural tension along the path of a nerve. A nerve can become irritated anywhere in the body. With the thoracic restrictions, a manipulation to the mid-thoracic spine often improves pain and neural tension by improving mobility. Think of it as a reset button as it also may have an impact on the sympathetic nervous system. References:
Egan W, Burns S, Flynn T, and Ojha H. The Thoracic Spine and Rib Cage: Physical Therapy Patient Management Utilizing Current Evidence. Current Concepts of Orthopaedic Physical Therapy, 3rd Ed. La Crosse, WI. 2011. Neumann, Donald. Kinesiology of the Musculoskeletal System: Foundations for Rehabilitation. 2nd edition. St. Louis, MO: Mosby Elsevier, 2010. 322-323. Print. |
 RSS Feed