
|
|
|
|
The Selective Functional Movement Assessment (SFMA) is a systematic method that focuses on whole body movement patterns. You might be familiar with the Functional Movement Screen (FMS) created by the same group. The FMS is a screen that can be used by any fitness professional. The SFMA is a diagnostic system (that can only be performed by medical professionals) similar to that of McKenzie. At the core of the SFMA is the concept of regional interdependence, "seemingly unrelated impairments in a remote anatomical region may contribute to or be associated with the patient's primary complaint." The assessment is broken into 7 Top Tier tests and graded as Functional and Non-painful (FN), Functional Painful (FP), Dysfunctional Non-painful (DN), and Dysfunctional Painful (DP). If a Top Tier test does not pass the FN grade, then that specific movement must go to a breakout pattern to find the true cause of dysfunction. To simplify things, the "true cause of dysfunction" can either be viewed as a mobility (Tissue Extensibility Dysfunction (TED)/Joint Mobility Dysfunction (JMD)) OR a Stability/Motor Control Issue (SCMD). Below is an example of Chris performing the Multi-Semental Flexion Top Tier Test with demonstration of the appropriate breakout patterns following. In the Multi-Segmental Flexion Top-Tier test, have the patient bend forward to touch their toes. The person assessing the movement should be looking for a uniform spinal curve, the thoraco-lumbar junction ending up over the feet, a sacral angle >70 degrees, and the ability to touch the toes without excessive exertion. If the person passes all the listed criteria, they are considered FN! Otherwise they are graded as DN, DP, FP and the Multi-Segmental Flexion breakout needs to be performed. As you can see, Chris is unable to touch his toes, so he is immediately given a DN (the motion was pain-free). At this point, we know they have some type of dysfunction. Whether it is a posterior chain extensibility issue or motor control issue, we are not sure. Therefore we must continue with the assessment. The next video (below), demonstrates the Single Leg Forward Bend. This will give you a sense if the dysfunction is symmetrical or not & if a single leg movement produces pain. In order to "pass" this test, the same criteria as above need to be fulfilled. All this test really tells you is if there is an asymmetry or not. As you can see below, Chris' movement is still DN, so the breakout continues (it would continue even if he received a FN). At this point, we know Chris has a dysfunctional movement pattern in standing so we need to see if the movement changes when he is placed in NWB. This tells us if he simply has a postural control issue. The next test (seen below) is the Long Sitting Test. To pass this test, Chris needs to touch his toes, have a sacral angle of at least 80 degrees, and have a uniform spinal curve. You will see in the video that he cannot touch his toes and the sacral angle does not reach 80 degrees. He has no pain, so the movement is graded DN. Hypothetically at this point, if Chris were to have passed (FN), we could assume he has a SMCD due to an issue with postural control because he is able to perform the motion once the effects of spinal loading have been reduced. He would then proceed to the Rolling component. Since Chris is unable to complete the motion when postural control is decreased, we now break apart each component of the motion to determine where the fault lies. To first assess the lower extremity component, we move to the Active Straight Leg Raise (seen below). This motion assesses the motor control/stability to actively flex the lower extremity, provided there is sufficient range. A minimum of 70 degrees of hip flexion is required. Be sure to watch that the contralateral thigh stays down and the knee remains extended on both legs. As you can see, Chris does not reach 70 degrees, so he receives a grade of DN. If Chris were able to complete this motion, we would know that Chris has adequate tissue/joint mobility and motor control in his lower extremities. We would then move on to the Prone Rocking Test. With Chris failing to pass the Active Straight Leg Raise, we must now move onto the Passive Straight Leg Raise to determine if the tissue/capsular length even exists for the motion to complete. A passing score would require 80 degrees of hip flexion (with the same precautions in the active test). Chris again does not pass the test (DN). If he had passed this test, we would then proceed to Rolling. After determining that there was a TED or JMD limitation, we can now use the Supine Knee to Chest test to determine if it is a 1 joint or 2 joint limitation (it could potentially be both). As you can see with Chris, he has a 1 joint limitation for sure (he likely has a 2 joint deficit as well) - DN. This positive test may indicate capsular hypomobility, decreased length of the gluteus muscles, or decreased neural mobility (or a combination). This is a location for treatment with Chris. Going back to the Active Straight Leg Raise Test, had Chris passed it he would have proceeded to the Prone Rocking Test below. With the lower extremity component of the Multi-Segmental Flexion Top Tier Test ruled out, we now need to assess the other primary component: lumbar flexion. A passing test requires a uniform curve and the thighs pressing against the lower rib cage. With the lower extremity motion already cleared, we now know the restriction if located in the lumbar spine as a TED or JMD. With the video below, it appears Chris receives a DN, but remember he had limited hip flexion, which can cause a false positive here. As you can see, the sequencing is important! Assuming this test receives a FN, we once again proceed to Rolling. Had your patient had a DN score here, this would again be a location of treatment for JMD or TED. Finally we arrive at the rolling pattern. once we have shown that adequate joint/tissue mobility is present for the required pattern, we can assess motor control patterns with this breakout. Look for your patient's ability as to whether or not they can complete the flexion rolling patterns. The motions should be smooth with dissociation of each component (you should not see log-rolling). Limited mobility anywhere in the chain can cause pauses or difficulties completing the motion (i.e. decreased cervical rotation could easily inhibit normal rolling, especially since it is the starting point for UE flexion rolling. Rolling can be scored just as the other tests. FN requires pain-free smooth rolling with no difficulty, pauses, or inability to dissociate the components - any of these lead to DN. DP and FP follow the usual scoring roles as well. Hopefully this gives you an idea of what the SFMA offers as a method of doing examination. This doesn't mean you should exclude your strength tests, special tests, neuro screens or even ROM measurements for certain patient populations. In a way, this method is even more objective than a goniometer allows due to the system's utilization of actual landmarks for completion. A goniometer may still have a place where regular progress is required (i.e. surgical patients, adhesive capsulitis, etc.). Instead this system can help to gain a very detailed look at each patient and ensure that you don't miss anything significant. Your patients often will comment how thorough you are (making you look like an even better PT!). The rest of the SFMA has a similar process of going through joint-by-joint assessments of motion and stability for the rest of the body as well. If you are interested in this, you may want to take the SFMA course. Gray Cook's book Movement details the system as well; however, the system has actually been updated since the book was written and is much more thorough and appropriate now. This method of examination has helped us to better determine the best locations for treatment and other potential causes to dysfunction. If you have any questions, do not hesitate to ask!
5 Comments
The next issue is the lack of research on exam measures and intervention techniques that we use in the clinic. We have had our mentors and fellow clinicians comment on where the evidence is for some of our treatment styles. A perfect example is Instrument Assisted Soft Tissue Mobilization (IASTM). While there is some initial research out there currently, there is hardly enough evidence to prove that IASTM is a high-quality, proven treatment. That being said, the results can be impressive. The key comes back to test and re-test your patients after a treatment. This applies to more than just IASTM. With your corrective exercises, joint mobs/manips, etc., assess your patient first (pain, ROM, strength, symptoms, SFMA) and re-check afterwards. Going back to IASTM, we have had particular success improving ROM without neural provocation using IASTM. Utilizing the neural tension test as our base and then follow-up, we have seen gains in ROM by as much as 45 degrees after simply a few minutes of IASTM. Basically, if you can prove that a treatment works by doing this, why stop it? Of course, we can't forget about incorporating these changes into our care and reinforcing them to lock in the changes, but the lesson is we shouldn't limit ourselves by what the literature is (or isn't) saying at the time.
 Already as a resident, I am seeing my clinical practice change dramatically. Whether it is dropping old habits, modifying a technique, or understanding the diagnostic process more thoroughly, I am constantly changing and improving my skills. Generally, these changes are made based off changes in the research and learning from expert practitioners.
Last Friday, Dr. E wrote a post regarding his top 5 things he has abandoned over the years. It was a very well written post defining how an expert practitioner has modified his practice. In physical therapy school, we all learn so much information. Frankly, it is overwhelming. There is tendency to believe that every skill one learns in school needs to be practiced OR that these are the only skills available. As you continue to practice and continue to develop your area of expertise, you gain a sense of what is important and what may be less efficient aspects of your clinical practice. You also begin to attend continuing education courses AND learn the different schools of thought. To be an expert clinician you need to recognize these changes in your own practice and think about why you changed that old habit. Read Dr. E's post to gain a sense of what I mean. 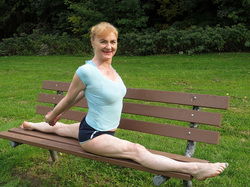 We are all guilty at one time or another of prescribing a hamstring stretch prematurely. You saw a patient bend forward to touch their toes and they abruptly stop short. This must be their hamstrings stopping their motion! Well unfortunately it is not that simple anymore. Modern literature tells us the reason they cannot touch their toes may be due to an array of possibilities: tight posterior chain muscles, adverse neural tensioning, or poor stability/motor control of the core musculature just to name a few. For the sake of this post we want to address hamstring tightness vs. adverse neural tension.
To begin this conversation, let's take that same patient above and place him/her in long sitting to reduce the effects of spinal loading. Now, postural demands are less than that in standing. We can focus specifically on muscle tightness vs. neural tension. The patient leans forward to touch their toes, but again nothing changes. We are no closer to finding our solution than we were in standing. Now, we bring the patient into supine, and the therapist performs a passive straight leg raise (PSLR). The patient cannot raise beyond 60 degrees of hip flexion. We still do not know, but we are getting close to the answer. Is it muscle tightness that is stopping this patient at 60 degrees or is the act of passively straightening the leg causing strain on the neural tissues. To answer this question, simply palpate the ASIS as you perform the PSLR. If you notice that hip flexion stops prior to movement at the ASIS, the answer is Neural Tension. If the ASIS begins to move prior to resistance, then hamstring tightness is the answer. Since the hamstrings attach to the Ischial Tuberosity, the body will naturally begin to posterior pelvic tilt once all the available range is taken up in the hamstring muscles. This posterior pelvic tilt will cause movement at the ASIS, letting you know the hamstring muscles have reached their end range. If no movement was noted at the ASIS, you can shift your hypothesis towards adverse neural tension. An additional component you can consider is the use of cervical flexion/extension to change the tension of the nerves and thus potentially alter SLR ROM. Just like any examination test, it is important to cluster your findings with other tests and measures. For example, if you suspect adverse neural tension, perform a SLUMP test as well. Additionally, always check side to side symmetry. 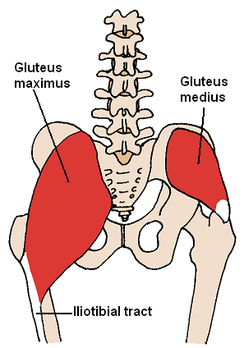 If you are familiar with Florence Kendall's method of Manual Muscle Testing (MMT), you are likely aware of the fact that she prefers to test muscle strength in a partially shortened position. When muscle length is in mid-range, it allows optimal cross-bridge linking, leading to a higher potential for force production. When muscles are over-extended or excessively shortened, the muscles lose that high frequency of cross-bridge linking. If you look at Kendall's MMT for the gluteus medius, you might see that she tries to emphasize the posterior fibers by having the patient on the side with the pelvis tilted forward and hip in extension, abduction, and lateral rotation. This is position completely shortens the muscle, thus potentially lower the validity of strength assessment. We have already discussed the use of evaluating hip abduction strength in a closed-chain position. Something else to consider is the fact that the gluteus medius is essential for pelvic stability throughout the entire stance phase of the gait cycle, not just mid-stance (where Kendall tests). Does it really matter if you have a level pelvis at midstance if you cannot keep your pelvis stable at heel strike? We have been presented another method for testing the gluteus medius in open-chain. Instead, place the lower extremity in hip abduction, lateral rotation, and flexion. The examiner then applies a flexion and adduction directed force. This position allows the muscle to not be completely shortened and tested in a functionally useful position. The position of flexion that is added can mimic heel strike in the gait cycle, making certain the muscle is strong enough to prevent pelvic drop as soon as stance begins.
 Something we are likely to be asked by our patients is "When can I return to driving?" This study showed that there is no specific time frame for return from joint replacement surgery. Any recommendations may result in patients either being restricted for too long or too little. The APTA Orthopaedic Section's Current Concepts on Hip Management recommends at least 4-6 weeks before returning to driving after surgery. Some obvious considerations include medications the patient is taking (as this may impair decision making, awareness, and reaction time), left versus right surgery (the left foot is typically not used for driving), and force production. With the inconsistent findings in the latest research, it would appear there is a need for further research in the area in order to be able to best determine when patients can safely return to driving.
|
Dr. Brian Schwabe's NEW Book in partner with PaleoHacks!

Learn residency-level content on our
Insider Access pages 

We value quality PT education & CEU's. Click the MedBridge logo below for TSPT savings!Archives
July 2019
Categories
All
|
 RSS Feed